Understand and fix warping in 3D printing
Warping, Wrapping or material distortion is the most undesirable event when the 3D print partially or completely detaches from the printing plate during the printing process.
picture: Dirk Brunner; Lizenz: CC BY SA 3.0
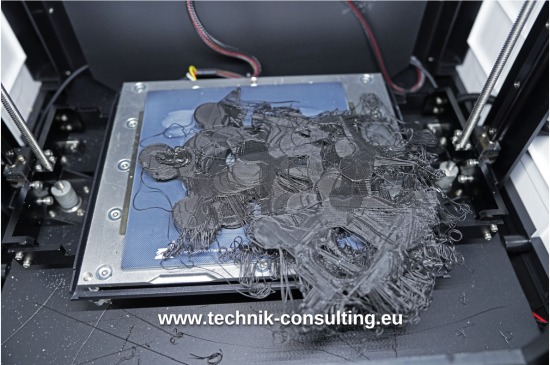
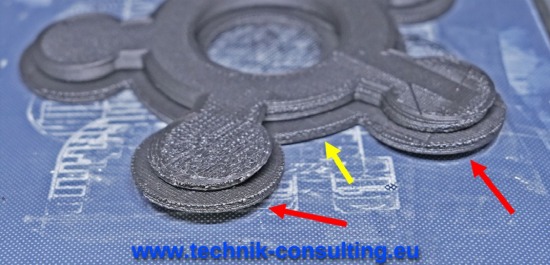
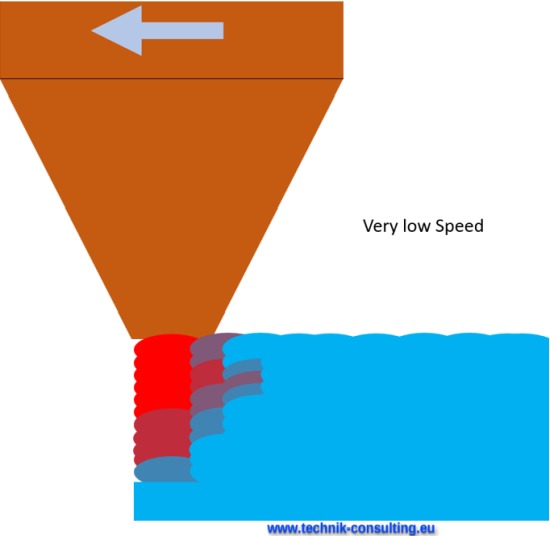
A typical error pattern caused by warping. The bottom print layer peels off and is moved across the print bed by the print head. If the bottom layer stops again, the printer prints further levels. This process is repeated, resulting in this damage pattern.
Warping leads to rejects of the printed part and can damage the printhead.
No warping
picture: Dirk Brunner; Lizenz: CC BY SA 3.0
Warping
picture: Dirk Brunner; Lizenz: CC BY SA 3.0
Main cause of Warping: thermal expansion of the plastic used
Other causes
- Poor print bed adhesion
- print head temperature not optimal
- print bed temperature not optimal
- filament not optimal (e.g. damp, inferior quality)
- print speed too fast
possible solutions (checklist)
- Sealed Hyperbaric Chamber (If necessary, a cardboard enclosure with a small hole to look through.
- Test different filaments from different manufacturers.
- Heated print bed
- Adhesives or adhesives on the print bed (hairspray, glue stick, etc.)
- print bed recommended for the plastic to be processed?
- decrease print speed
- Increasing the contact area on the print bed, e.g. with a brim
- Using a raft (similar to socket under the print object)
- level print bed
- clean print bed
- Temperature distribution on the print bed bad (let the print bed preheat for a few minutes)
- reduce infill in model
- reduce layer thickness
- Roughen the print bed (e.g. with sandpaper)
- First layer with high material flow
- First layer with elevated temperature (filament and print bed)
- dry filament
- disable fans for first layers
- Use high quality filament
Materials with very little tendency to wrap
- PLA
- ABS
- HIPS
- PA12 (Nylon)
- PA12+CF (nylon + carbon fiber)
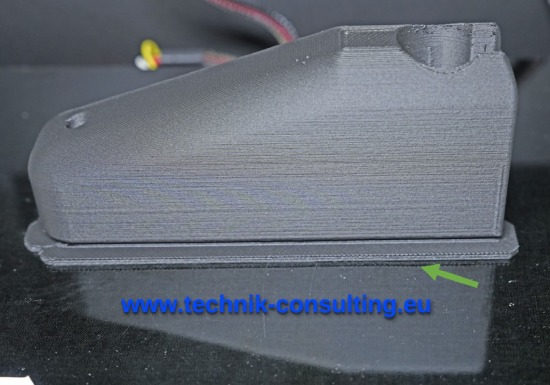
Typical signs of warping
The print model usually detaches from an edge or corner of the printing plate. Sometimes just something. Often, warping occurs on the side where there is a draft (e.g. door area) or where the print bed is farther from the nozzle (print bed leveling error).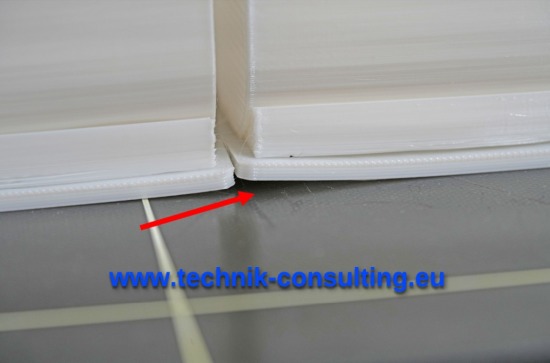
picture: Dirk Brunner; Lizenz: CC BY SA 3.0
picture: Dirk Brunner; Lizenz: CC BY SA 3.0
picture: Dirk Brunner; Lizenz: CC BY SA 3.0
The coefficient of expansion is not everything
Compared to PLA, ABS has a significantly higher coefficient of expansion (approx. +50%) and shows clear warping.However, it would be too easy if materials with a very low coefficient of expansion also show low warping. Print materials that are highly filled (e.g. with glass fibers) have a significantly lower coefficient of thermal expansion than the base material. However, the filling influences the material flow (e.g. anchoring in the printing plate on a microscopic level) as well as the "sticky" surface. Unfortunately, glass fibers or carbon fibers do not adhere to the printing plate. An example of such a material is PA12+CF versus PLA.
Anchoring on the pressure plate
A printing plate appears rough under the microscope.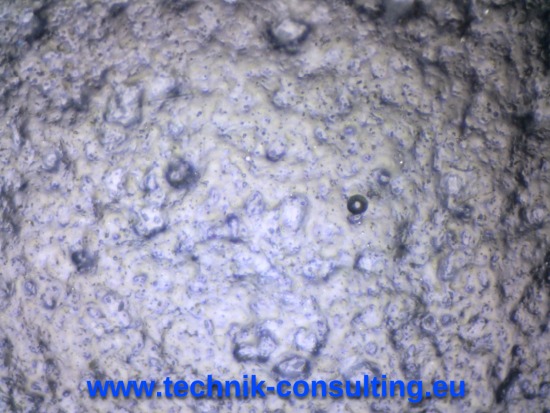
picture: Dirk Brunner; Lizenz: CC BY SA 3.0
picture: Dirk Brunner; Lizenz: CC BY SA 3.0
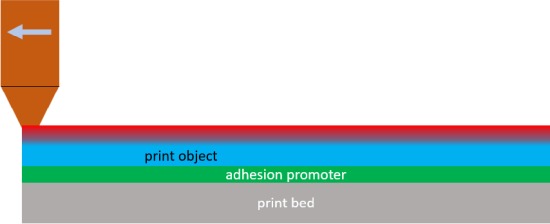
Causes of adhesion to the print bed
Adhesion of the printed object to the printing plate is ensured by many physical mechanisms. The most important are:Form closure on a microscopic level
picture: Dirk Brunner; Lizenz: CC BY SA 3.0
picture: Dirk Brunner; Lizenz: CC BY SA 3.0
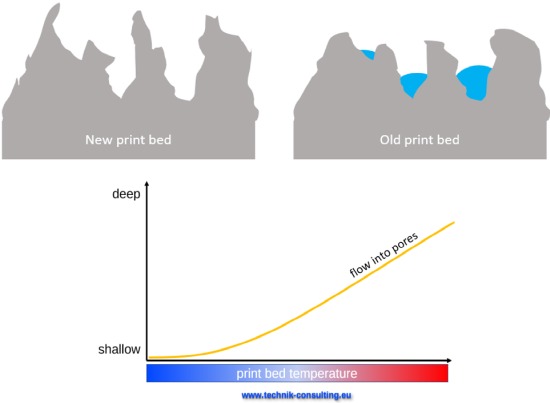
This effect changes over time. The print bed is slowly smoothed out on a microscopic level (parts break off or are rounded). In addition, plastic gets stuck in the print bed. This can be an advantage, as the next time you print, the plastic can bond better to the plastic that is already there. These plastic residues are disadvantageous when changing to an incompatible printing material or when there are aging effects. In the case of printing materials with fillers, it is primarily the plastic on the surface that dissolves and the filling material remains. This is often not a suitable printing surface.
Should warping recur over time, this may be the cause. Replacing the printing plate is often the most economical solution.
fusion welding
Plastic residues already present in the printing plate are melted again and combine with the new plastic from the printing nozzle.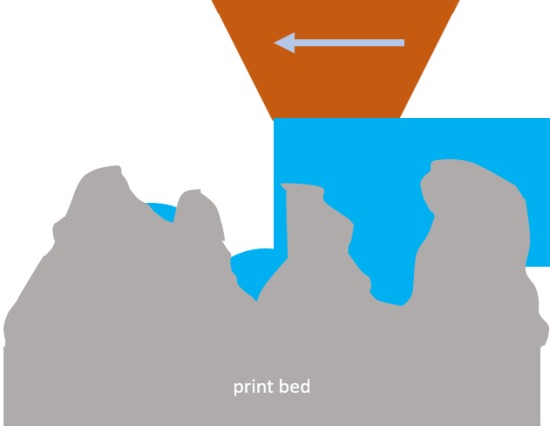
picture: Dirk Brunner; Lizenz: CC BY SA 3.0
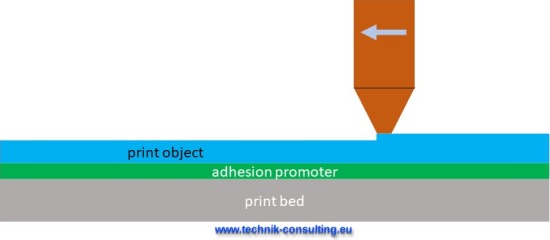
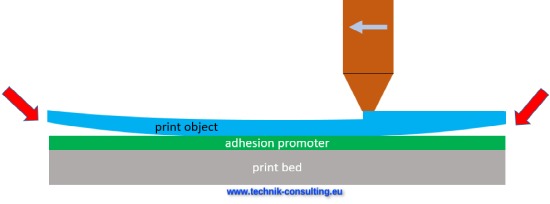
adhesion
In simple terms, adhesion is the stickiness of two substances to one another. If the plastic to be printed and the printing plate are very sticky (= high adhesion forces), the plastic adheres strongly to the printing plate. warping is effectively prevented. This can be achieved with suitable surfaces (coatings). The exact physical and chemical causes are not yet understood and are the subject of numerous research projects.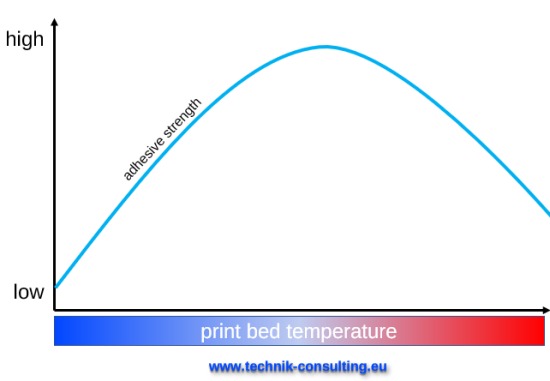
picture: Dirk Brunner; Lizenz: CC BY SA 3.0
Example of the course of the adhesive strength of a glue stick with the first print layer. If the printing plate is too cold, the plastic cannot make intimate contact with the surface. The result is a low adhesive force. The same applies if the pressure plate is too hot. The printed plastic has already become so soft here that it no longer has the strength to adhere. Both favor warping. There is an optimal temperature range, which depends on the filament, printing plate, adhesion promoter (e.g. glue stick), printing speed, etc. . Here own tests are necessary.
Note: The point of form closure mentioned above already falls under adhesion, but was listed separately due to its relevance.
Too much adhesion
If the adhesion to the printing bed is too high, the printed object can only be detached from the printing plate with difficulty. Sometimes the printing plate or the printed object is destroyed in the process.Here are simple solutions:
- With the next print, print the first level with more distance to the printing plate.
- If an adhesion promoter (e.g. glue stick) was used, simply place the printing plate with the printed object in lukewarm water with a little washing-up liquid. The adhesion promoter is slowly dissolved. In the case of large printed objects with a closed surface, this can take several days.
- Allow the print object with the printing plate to cool down considerably (e.g. in the freezer). Due to the shrinkage in the cold, the printed object can already come loose. If not, take out the still ice-cold print object with the printing plate and pour hot water over the printing plate from below. This creates strong thermal stresses and the printed object usually detaches. Attention: The pressure plate can be destroyed.
- Use flexible pressure plates.
Optimum temperature
Just three parameters have a strong influence on the warping. The temperature of the printing plate and the extruded plastic have a great influence on the warping.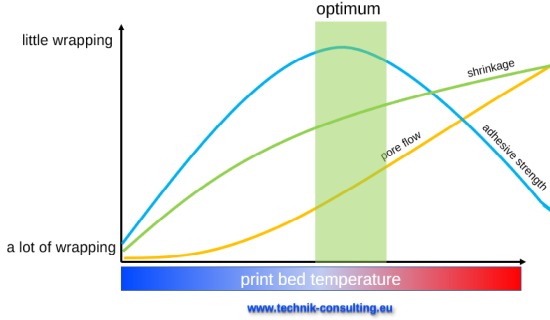
picture: Dirk Brunner; Lizenz: CC BY SA 3.0
Increase adhesion to the print bed
Brim
A brim is an enlarged first layer. The brim is firmly attached to the print object and must be removed manually (e.g. cut, sanded) after the printing process.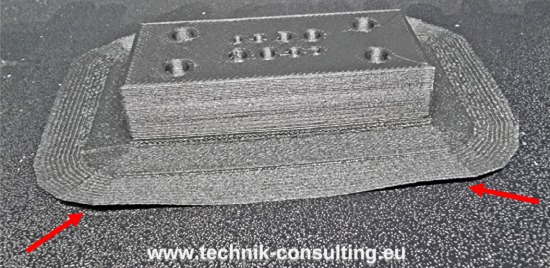
picture: Dirk Brunner; Lizenz: CC BY SA 3.0
Raft
A raft is a kind of base under the printed object.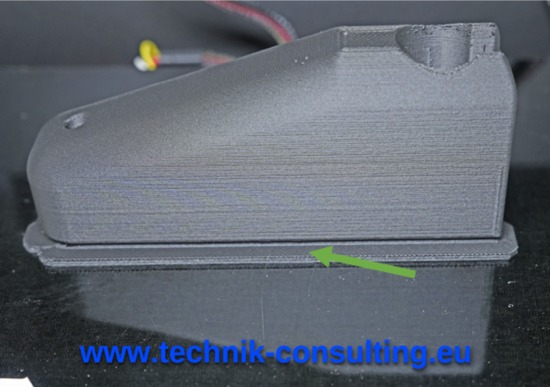
picture: Dirk Brunner; Lizenz: CC BY SA 3.0
Overextrusion of the first layer
When printing the first layer, significantly (e.g. +50%) more plastic is extruded than necessary. This can be adjusted when slicing. The excess plastic improves adhesion.Higher printing temperature of the first layer
The first layer is printed at a higher temperature (e.g. +20 °C). As a result, the plastic is more fluid and can bond better to the printing plate. Reset the temperature after the first shift. Otherwise other disadvantageous effects (e.g. stringing) are added.Higher bed temperature of the first layer
A heatable print bed is a prerequisite for problematic materials. Before printing, heat up the print bed and allow enough time for the temperature distribution to be even.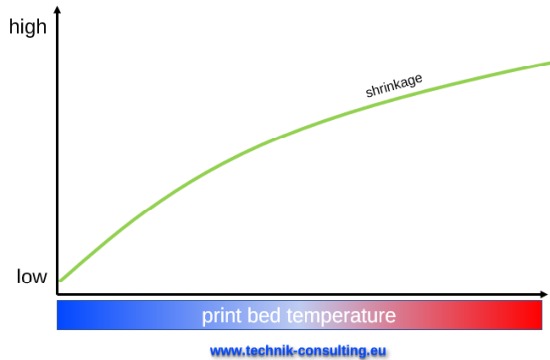
picture: Dirk Brunner; Lizenz: CC BY SA 3.0
The first layer is printed with a higher print bed temperature (e.g. +20 °C). This allows the viscous plastic from the printing nozzle to penetrate deeper into the microscopically small structures on the printing plate. The result is better adhesion to the print bed.
adhesion promoter
Using adhesion promoters (e.g. glue stick). This can increase adhesion.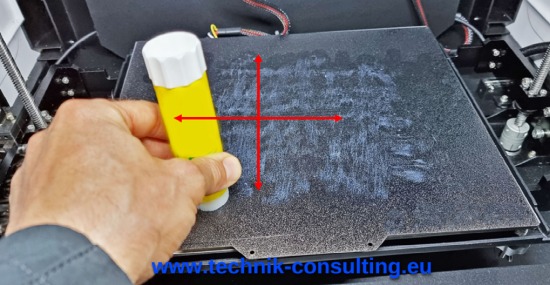
picture: Dirk Brunner; Lizenz: CC BY SA 3.0
Leveling the print bed
This is an essential point. The print bed must be well aligned, otherwise the distance between the printhead and the printing plate will change too much when printing the first layer. This in turn has a significant influence on the adhesion of the printed object to the printing plate.With cheap printers with wobbly mechanics, a good and permanent alignment of the print bed (leveling) can be almost impossible.
Reduce the distance to the print bed
The print head is deliberately moved very close to the print bed during the first layer. As a result, the plastic is pressed onto the pressure plate under greater pressure and can bond with it better. Overdoing this can cause the extruder to "spin" which can be heard by the extruder making a clicking noise. In the worst case, no more filament will be fed later.If the distance is too small and the print bed is poorly aligned, there is a high risk of damaging the print head and the print bed, as the printer then drags over the print bed.
Change filament
If the filament is of inferior quality, further efforts are pointless. This is where replacing the filament makes the most sense.Even color additives can affect the adhesion of the filament. Just try it out here.
Dry Filament
Some filaments (e.g. ABS, PA12) react sensitively to increased moisture content, which comes from the ambient air. These filaments must be dried before use. The manufacturer's information is relevant for this. Otherwise, the following procedure has proven itself. Let the filament dry in the oven at 60°C with the door slightly open for several hours. Then store in a bag with desiccant or print directly.
Some filaments can quickly absorb moisture from the ambient air and are no longer suitable for printing a few hours after drying. The only thing that helps here is a heatable filament dryer from which printing is carried out directly. These have proven themselves with ABS and PA12+CF.
A wet filament can be recognized by an unsteady extrusion process. If the filament is simply printed out of the nozzle into the air, bubbles can sometimes be seen at the print nozzle. The extruded plastic should always come out of the print nozzle smoothly and evenly.
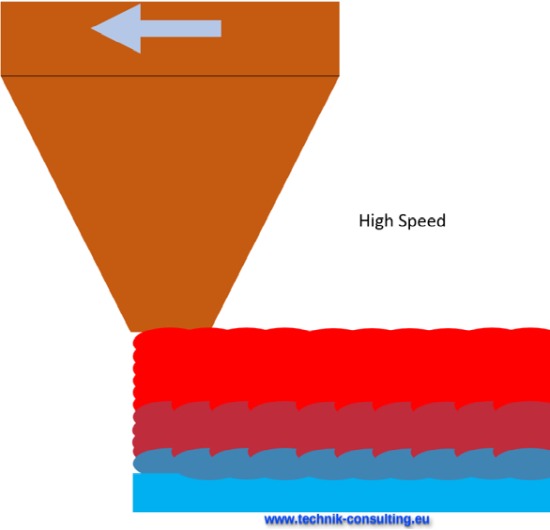
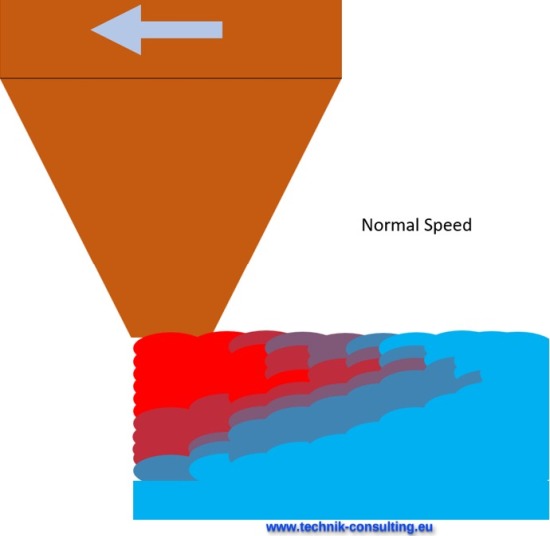
Reduce print speed
This is easy to implement and has a major impact on the adhesion of the print to the print bed.The cooling speed of a 0.2 mm thick printed layer of PLA to about print bed temperature is about 15 seconds. The less distance the print head covers in this time, the lower the forces in the material.
picture: Dirk Brunner; Lizenz: CC BY SA 3.0
picture: Dirk Brunner; Lizenz: CC BY SA 3.0
picture: Dirk Brunner; Lizenz: CC BY SA 3.0
picture: Dirk Brunner; Lizenz: CC BY SA 3.0
As usual, there are limits here. If the printing process takes too long, this is not economical. In addition, the hot plastic in the print head usually changes negatively over time.
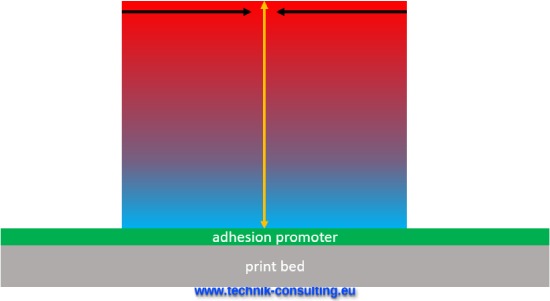
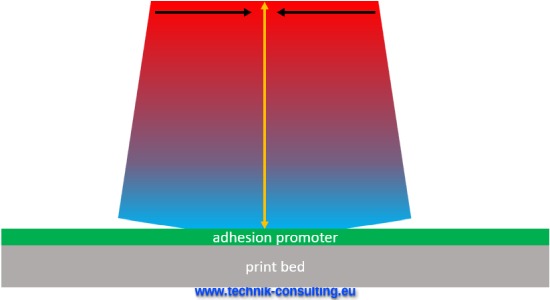
Reduce layer thickness
It may sound strange at first, but reducing the layer thickness of the printing process also affects the warping.
picture: Dirk Brunner; Lizenz: CC BY SA 3.0
A thin print layer is shown here. The black arrows symbolize the force within the print layer due to the shrinking process of the plastic as it cools.
The thin print layer means there is little leverage on the edges of the print which could cause warping.
picture: Dirk Brunner; Lizenz: CC BY SA 3.0
picture: Dirk Brunner; Lizenz: CC BY SA 3.0
Sealed printing chamber
A closed printing chamber makes sense for printing materials that are prone to warping (e.g. ABS, PA12). Temperature differences are greatly reduced by the pressure chamber. Even a cool draft in the wrong place can cause warping.If possible, all fans should be deactivated. This allows for an even temperature distribution. Before printing, the pressure room or the pressure chamber should have been brought up to temperature. This may require a lead time of several hours before the printing process. During the actual printing (especially at the beginning) the chamber should not be opened.
Reduce print object
If the warping cannot be managed with a larger print object, the only option is to break it down into smaller sub-objects. These are later connected to each other (e.g. by gluing).Reduce the infill at the print object
If the filling in the print object is reduced, the forces caused by the shrinkage are lower because there is less material.roughen the print bed
You can try to roughen the print bed. A random orbit sander with a 60 grit has proven itself here.
warping not controllable
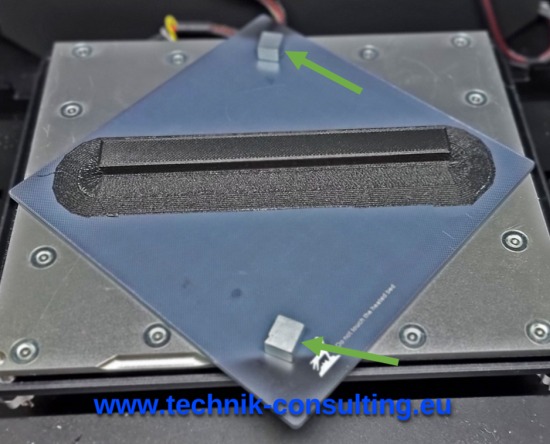
If the measures described above do not help: There are cases in which the filament is absolutely unsuitable for larger printed objects. The only thing that helps here is changing the filament.Printhead damaged by warping
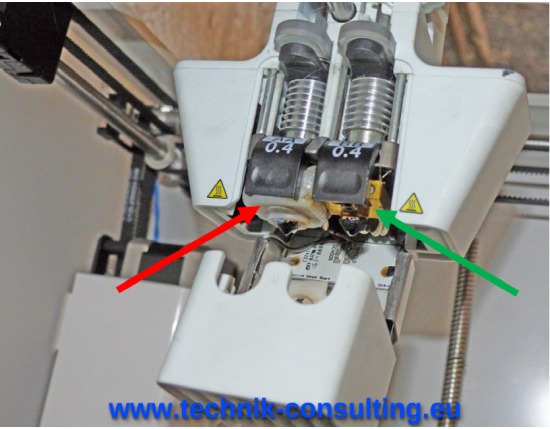
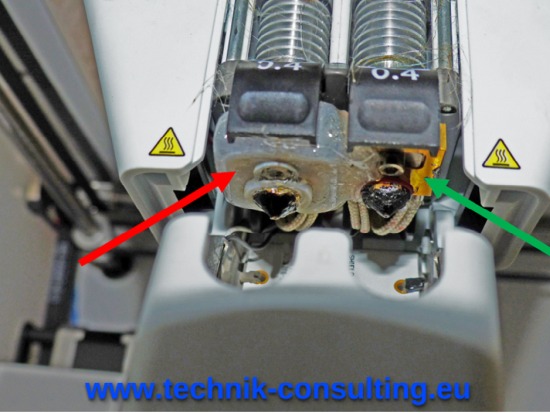
The print model can be completely detached from the printing plate by warping and is then usually moved with the print head on the printing plate. The print head extrudes a lot of material at the same point on the model. In the best case, this can block the extruder and no longer feed filament. In the worst case, the viscous plastic finds its way into the print head and can render it completely unusable.Here a destroyed print head by warping with white plastic (red arrow). The viscous plastic has almost completely covered the left print head in the lower area. For comparison, the right printhead (green arrow) is still OK.
picture: Dirk Brunner; Lizenz: CC BY SA 3.0
picture: Dirk Brunner; Lizenz: CC BY SA 3.0
Talk to us.